How to Replace Your Cabin Filter for Fresh Air?
Maintaining your Cabin Filter is vital for a fresh and healthy driving experience. A study from the Automotive Aftermarket Suppliers Association revealed that 45% of drivers neglect replacing their cabin filters regularly. This oversight can lead to poor air quality inside the vehicle. According to Dr. Sarah Thompson, a leading expert in automotive health, “A clean cabin filter is essential for optimal air quality and comfort.”
Many drivers may not realize that a clogged cabin filter can trap pollutants, allergens, and dust. This can impact air quality significantly. Observations show that when filters go unchecked, air circulation decreases, leading to foggy windows and musty odors. Furthermore, strange odors can arise from bacteria buildup in the filter, hinting at an essential maintenance task.
Addressing the cabin filter is often forgotten. Yet, it is inexpensive and easy to replace, requiring minimal tools. This simple action ensures you breathe clean air during your daily commute. Ignoring this small component can deteriorate your overall driving experience, highlighting the need for routine check-ups.
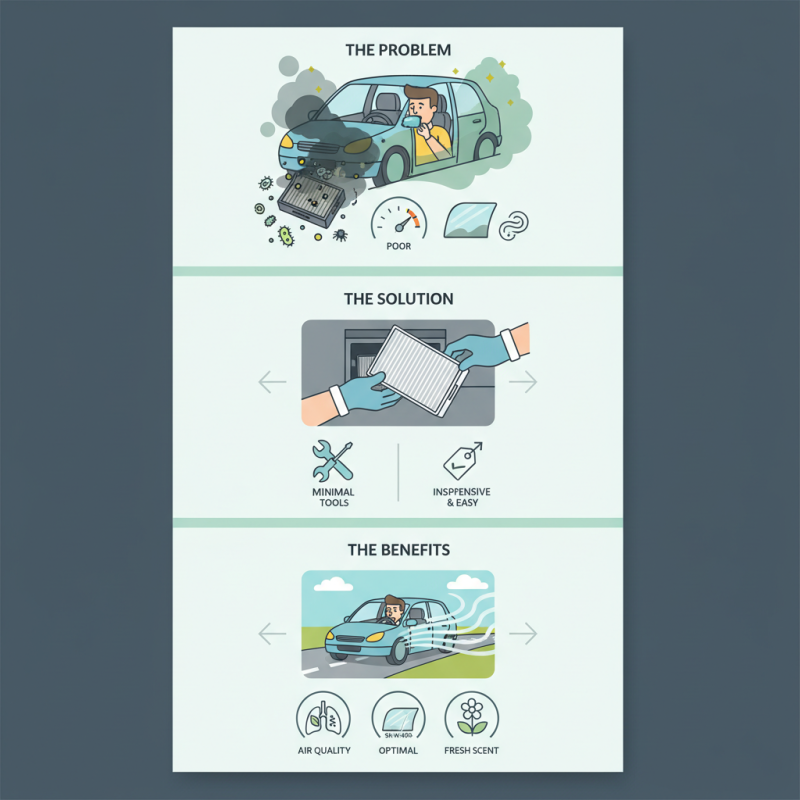
Understanding the Importance of a Cabin Air Filter
Cabin Air Filters play a crucial role in maintaining the air quality inside your vehicle. According to the American Lung Association, poor indoor air can significantly impact health. A clean cabin air filter removes up to 99% of pollutants. This includes dust, pollen, and smoke. Neglecting to replace this filter can lead to respiratory problems for passengers.
The EPA states that vehicle interior air can be more polluted than outdoor air. A dirty cabin air filter can reduce airflow and cause musty odors. For instance, some reports indicate that filters can become clogged within just 12,000 miles of driving in urban areas. This inefficiency can affect the overall comfort during your ride. Moreover, changing the cabin air filter regularly can improve vehicle performance and reduce energy consumption.
It's easy to overlook the cabin air filter, yet it should be replaced at least once a year. Many people forget this vital step. As a result, they breathe in harmful particles. It can be inconvenient to remember. However, prioritizing air quality in your car is essential for health and well-being. Regular maintenance can save you from bigger issues down the road.
How to Replace Your Cabin Filter for Fresh Air? - Understanding the Importance of a Cabin Air Filter
| Dimension | Details |
| Filter Type | HEPA, Activated Carbon, Standard Particulate |
| Replacement Frequency | Every 12,000 to 15,000 miles or annually |
| Signs of a Clogged Filter | Reduced airflow, unpleasant odors, high pollen levels inside |
| Benefits of Replacement | Improved air quality, enhanced HVAC efficiency, reduced allergens |
| Cost Range | $15 to $70 depending on the type and vehicle model |
| DIY Installation Time | 15 to 30 minutes |
| Common Tools Needed | Screwdriver, Pliers, Vacuum (optional) |
Signs That Your Cabin Filter Needs Replacement
A clean cabin filter is essential for fresh air during drives. You might need to replace it if you notice strange odors inside your vehicle. These smells can come from mold or mildew building up in the filter. Even after using air fresheners, those scents might linger.
Another sign of a clogged filter is reduced airflow from the vents. If the air feels weak or doesn’t blow at all, your filter could be the culprit. Dust and dirt accumulate over time, making it difficult for air to pass through. Look for dirt on the filter itself when checking it.
Additionally, frequent allergies while driving may indicate a filter issue. If you're sneezing more than usual in your vehicle, consider replacing the filter. This change could improve your comfort level. Sometimes it’s a simple task yet often overlooked. Pay attention to these signs, and don’t hesitate to make a change for better air quality.
Cabin Filter Replacement Frequency & Air Quality Improvement
Step-by-Step Guide to Accessing Your Cabin Air Filter
Replacing your cabin air filter can significantly improve the air quality inside your vehicle. Accessing it is straightforward, but some may find the process tricky. Here's a step-by-step guide to help you navigate through it.
Start by identifying the location of your cabin air filter. In many cars, it can be found behind the glove compartment. You may need basic tools like a screwdriver to remove any screws. Once the glove compartment is out of the way, you'll see the filter housing. Pull out the old filter carefully; it could be dusty or have debris. Keep a cloth handy to catch any particles.
Tip: Always check for the orientation of the filter before installing a new one. This ensures proper airflow. Mistakes happen; the filter may not fit correctly if inserted wrongly.
After securing the new filter, replace the glove compartment. Ensure everything is back in its place. Sometimes, it can be frustrating if parts don’t align perfectly. Take a moment to check your work before driving off.
Tip: Schedule regular checks on your cabin air filter. This helps maintain long-term air quality and saves you from potential respiratory issues. Track your replacement schedule for peace of mind.
How to Choose the Right Replacement Cabin Air Filter
Choosing the right replacement cabin air filter is crucial for maintaining fresh air in your vehicle. Look for filters that meet your car's specifications. Always check the size and compatibility. Many filters are designed to trap dust, pollen, and other allergens. A good filter can make a difference in air quality.
Tips: Consider high-efficiency particulate air (HEPA) filters. They capture smaller particles effectively. Read reviews to gauge filter performance. Remember, quality matters more than price sometimes.
Don’t forget about the installation process. Some filters fit tightly, making them hard to replace. If it doesn't seem to fit, reread the instructions. It can be frustrating, but patience is essential. You may need to replace the filter more often in heavy pollution areas. Dust builds up quickly.
Keep track of when you last changed your filter. Some drivers forget and wait too long. A dirty filter can disrupt airflow, causing your air conditioning system to work harder. It’s a small detail that can lead to bigger issues.
Installing Your New Cabin Air Filter: Best Practices
Installing a new cabin air filter can significantly improve the air quality in your vehicle. Begin by locating the filter compartment, typically found behind the glove box. Make sure to use the right tools for the job. A flathead screwdriver might be all you need. Remove the screws or clips with care.
Next, take out the old filter. You might encounter some dust and debris. This can be a bit messy. Gently clean the compartment with a damp cloth. It's essential to ensure no residue is left behind.
When inserting the new filter, pay attention to airflow direction. It's a common mistake to install it incorrectly. As you replace the cover, double-check that it is secure. Don’t rush this step. A loose compartment can cause rattling noises. Remember, attention to detail is crucial for optimal air quality.